- 서버리스란?
- 서버가 없다는 말이 아닌, 서버 운영 작업을 클라우드 공급자에게 이전하여 사용자가 서버 관리를 할 필요 없다는 뜻
- AWS 서버리스 서비스 종류
- Compute
- Lambda
- Fargate
- Data Stores
- S3
- Aurora
- DynamoDB
- Integration
- EventBridge
- API Gateway
- SQS
- SNS
- Step Functions
- AppSync
- Compute
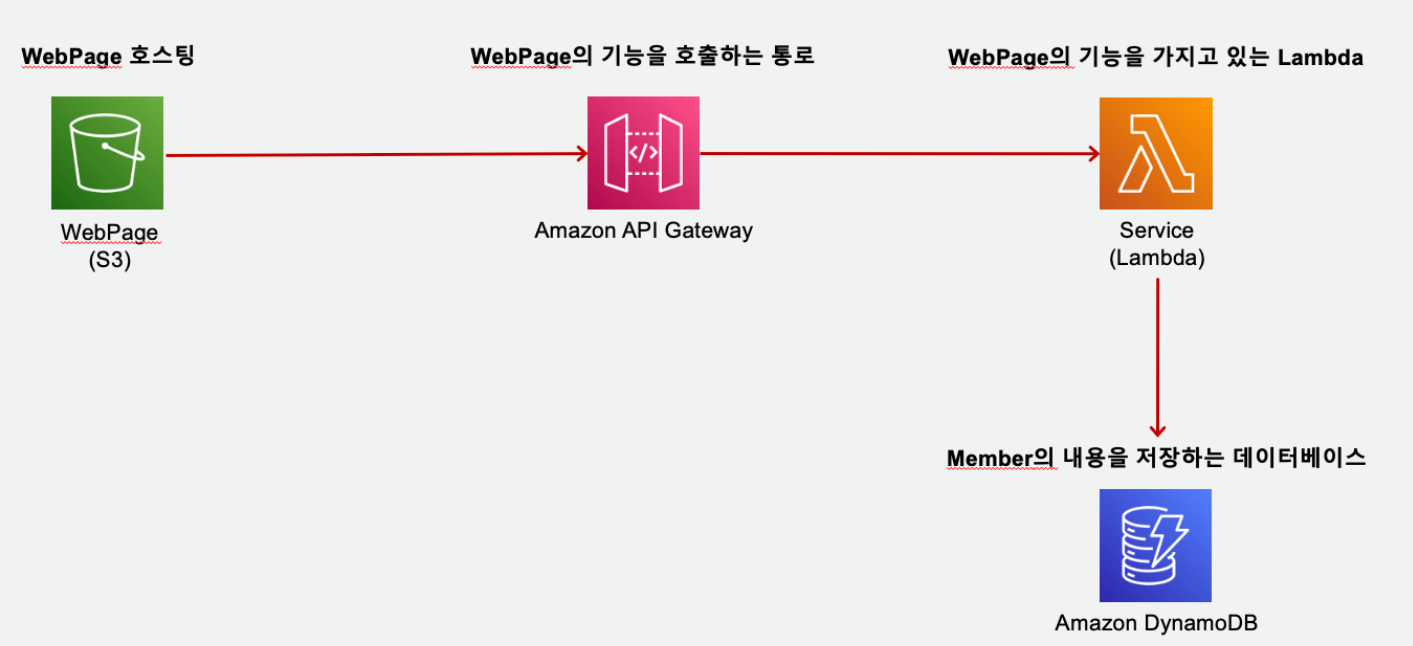
- 실습할 아키텍처 구성
- S3(WebPage 호스팅) ⇒ API Gateway(기능 호출) ⇒ Lambda(WebPage의 기능을 가지고 있음) ⇒ DynamoDB(내용 저장하는 DB)
- AWS Lambda
- 서버리스 컴퓨팅 플랫폼
- AWS API Gateway
- REST, WebSocket API를 생성, 게시, 유지, 모니터링 하는 서비스
- Cient (Restful: HTTP API & REST API) ↔ Amazon API Gateway (Web Socket) ↔ Client
- AWS DynamoDB
- 대규모에 최적화된 관리형 NoSQL 데이터서비스
- SQL은 DB가 수직적 확장 (스케일업, 메모리 키우는..)
- NoSQL은 수평 확장 (스케일아웃, 처리 서버를 늘리는..)
- NoSQL도 Partition Key + Sort Key인 Primary Key 존재
- AWS S3
- 어디서나 원하는 양의 데이터를 저장하고 검색할 수 있도록 구축된 객체 스토리지
실습
- IAM 생성
- AdministratorAccess, IAMUserChangePassword 퍼미션 추가
- Dynamo DB 테이블 생성
- Name: hello-member
- Partition Key: name
- Lambda 함수 생성
- name: api-service-create
- Runtime: Python 3.9
- role 변경: Create a new role from AWS policy templates 체크
- name: my-lambda-role
- Policy templates: DynamoDB (Simple microservice permissions)

- 생성 완료
- Lambda Code source 수정 및 테스트
- 수정
- 해당 함수 들어간 후 Code source 에 아래 코드 복붙
- 코드
-
import json
import boto3
import random
import json

def lambda_handler(event, context):

    member_name = ['Ama','Jone','Zon','Penny','Jessie']
    member_status = ['Happy','Sad','Serious','Satisfied','Free']

    dynamodb = boto3.resource('dynamodb',endpoint_url='http://dynamodb.ap-northeast-2.amazonaws.com')
    member_table = dynamodb.Table('hello-member')

    name = member_name[random.randint(0,4)]
    status = member_status[random.randint(0, 4)]

    member_table.put_item(
       Item={
            'name': name,
            'status': status,
        }
    )

    documents = {'name':name,'status':status}

    print(documents)

    return {
        'statusCode': 200,
        'headers': {'Access-Control-Allow-Origin': '*'},
        'body': json.dumps(documents)
    }
-
- 코드
- Deploy 클릭
- 해당 함수 들어간 후 Code source 에 아래 코드 복붙
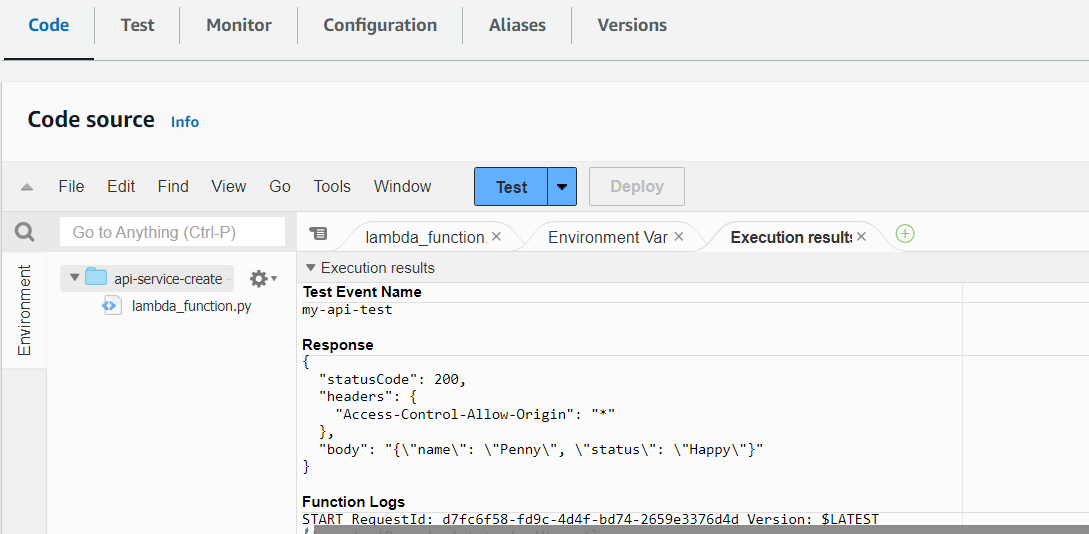
- 테스트
- Code source에 Test 클릭
- Event name 작성 후 Save
- Test 다시 클릭하여 테스트
- 수정
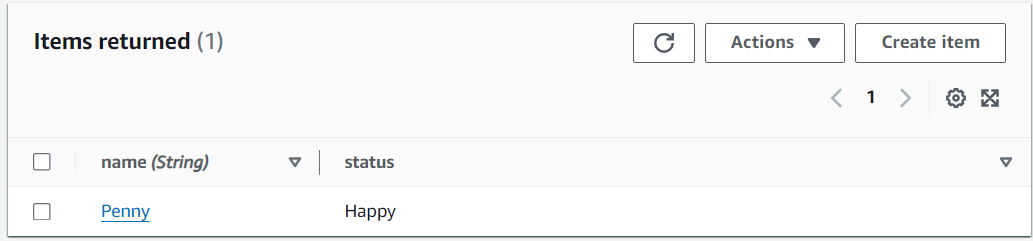
- DynamoDB 값 확인
- DynamoDB - Explor items 클릭
- 아까 테스트하면서 들어간 값이 출력된다
- API Gateway 생성 및 테스트
- REST API 생성
- name: my-api
- 생성 완료

- 메소드 만들기
- Resources- Create method
- Method type: GET
- Integration type: Lambda function
- Lambda proxy integration 활성화
- Lambda function 은 아까 만든 람다 함수 클릭

- create method 클릭
- 메소드 테스트
- 만든 메소드 (GET) 클릭하여 Test 클릭 (값은 건들지 말고 그대로 테스트 버튼 클릭)

- Status 가 200으로 나온다면 성공

- REST API 생성
- API Gateway 추가 설정
- Enable CORS 활성화
- API 루트(/) 클릭하여 이동
- Enable CORS 클릭
- Access-Control-Allow-Methods: GET 클릭
- Save 클릭
- Invoke URL 생성
- Resouces- Deploy API 클릭
- stage: New stage
- name: dev
- Deply 클릭
- Invoke URL 생성 완료
- Enable CORS 활성화
- S3 생성
- 버킷 생성
- S3- create bucket 클릭
- Bucket name: my-bucket-무작위숫자
- Block all public access 체크 해제
- I acknowledge that the current settings might result in this bucket and the objects within becoming public. 체크

- create bucket 클릭
- 파일 업로드
- 아래의 코드 내용을 index.html 로 저장 후 50번째 줄의 url: "URL을입력하세요", 부분을 아까 만든 Invoke URL을 넣어서 수정
- 코드 (index.html)
-
<html> <head> <meta charset="utf-8" name="viewport" content="width=device-width, height=device-height, minimum-scale=1.0, maximum-scale=1.0, initial-scale=1.0"> <script src="https://ajax.googleapis.com/ajax/libs/jquery/3.3.1/jquery.min.js"></script> <title>Hello World!</title> <style> #title { font-family: arial; font-size: 2em; color: #eb971a; margin-top: 50px; text-align: center; } button { background-color: #eb971a; border: none; color: white; border-radius: 5px; width: 40%; height: 35px; font-size: 13pt; margin-top: 30px; text-align: center; } #sentence { font-size: 17pt; margin-top: 30px; font-weight: bold; color: #eb971a; } </style> </head> <body> <p id="title">Hello World From <b>Lambda</b></p> <hr id="lambda-line" width="800px" align="center" color="#eb971a;"> <center><button onclick="checkEvent();">Who are you?</button></center> <center> <div id="sentence"></div> </center> </body> <script type="text/javascript"> function checkEvent() { $.ajax({ type: "GET", url: "URL을입력하세요", dataType: 'json', success: function (data) { document.getElementById('sentence').innerHTML = data.status + " " + data.name }, error: function (error) { alert('ERROR::'); console.log(error) } }); } </script> </html>
-
- 코드 (index.html)
- Upload 클릭
- Add files- 아까 만든 index.html 파일 선택
- Upload 클릭
- 아래의 코드 내용을 index.html 로 저장 후 50번째 줄의 url: "URL을입력하세요", 부분을 아까 만든 Invoke URL을 넣어서 수정
- 버킷 생성
- S3 정적 웹사이트 호스팅 기능 활성화
- Properties 수정
- 만든 버킷 클릭 후 Properties 클릭
- 제일 아래 스크롤하면 Static website hosting- edit 클릭
- Static website hosting: Enable 선택
- Index document: index.html 작성
- Save changes 클릭
- Bucket website endpoint 생성 완료
- Permissions 수정
- Bucket policy- Edit 클릭
- 아래 코드 본인 버킷번호로 수정 후 붙여넣기
- 코드
-
{
  "Version": "2012-10-17",
  "Statement": [
    {
      "Sid": "Stmt1709405011428",
      "Action": [
        "s3:GetObject"
      ],
      "Effect": "Allow",
      "Resource": [
        "arn:aws:s3:::my-bucket-[본인버킷번호]",
        "arn:aws:s3:::my-bucket-[본인버킷번호]/*"
      ],
      "Principal": "*"
    }
  ]
}
-
- 코드
- Save changes 클릭
- Properties 수정
- 웹사이트 접속해보기
- 위에서 만든 Bucket website endpoint URL로 접속

- 아래 아키텍처의 형태로 서버리스 웹 애플리케이션 생성 완료
참고
728x90
'Conference & Lecture' 카테고리의 다른 글
| [웨비나] AWS TechCamp / AWS Clean Rooms를 활용한 프라이빗한 데이터 공유 환경 구축 (0) | 2024.09.04 |
|---|---|
| [웨비나] AWS TechCamp / AWS 핵심 서비스로 웹 애플리케이션 구축 (1) | 2024.09.03 |
| [특강] 학교 특강 / 서비스의 전체 단계 (0) | 2024.05.25 |
| [특강] 학교 특강 / 개발자의 업무 수행과 기술 (0) | 2024.05.25 |
| [컨퍼런스] 2023 Google I/O Extended Seoul (0) | 2023.07.30 |